Saturday, July 30, 2022

Assembling Floor

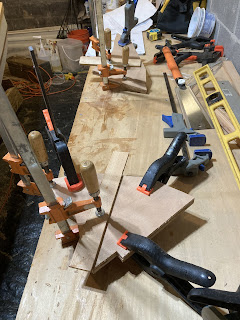
I'm continuing work on the floor/platform. Here are the boards cut to size.  


Oops! How did I cut one short????? I know I cut it on the line. I must have not seated the board against the other end. I did this yesterday. Tonight I cut another board. Fortunately I had enough from the pile I confiscated from the vacant building next to church.

I'm going to use the planed sides for up. It's a fresh finish on that side. 

I decided to but lateral boards underneath to hold the eight boards together starting with the two curved boards against the seats. That will give me the correct dimension cross-ways. There will be 4 cross pieces since the floor will be cut into two more easily managed parts. 

Here we go.


If you look closely, that's two cross pieces in the middle. One is wider than the others because it will create a ledge for the other half to sit on and will have a folding leg attached to provide support in the middle of the platform.

I'm going to screw these pieces together. I think that will be sufficient. I broke down and spent $10 for a countersink bit. I figured it would make it so much easier since I'll have a pile of screws to sink. 

It's going to take another night or two to finish the floor. After I get it assembled, I've got to figure out how to best support it when it's in the lower position. The plans call for "joists" but I believe I'm going to leave them out in the event that I want to leave the removable floor out and have a deeper cockpit on occasion (I'm thinking if I can ever get Robin on the boat). 


Thursday, July 28, 2022

Planing Floorboards

I was hoping someone who had a planer would come to my rescue and help me with the floor boards. I tried planing a trial board yesterday and it worked pretty well so I decided to go ahead and plane the boards myself with my hand held power planer. 

Here's the setup. Notice the 3 four stops: 2 on each side and one on the end. A couple boards had a little bend and I had to clamp down the ends.


Here's the pile of shavings left over. I had to shave off about 1/8" from each board. I planed off the rough side of the cedar boards. I'm actually going to use those sides as the ones I'll turn up. 


Since I had to make two rows of passes with the power planer, I sometimes had a slightly uneven edge between the two passes. A little sanding took care of that.

 I'll shoot a pic of the boards set up on the boat later.


Wednesday, July 27, 2022

Rub Rail Attached

I had thought about waiting to attach the rub rails, but, hey, why not? So I got one done tonight.

I wasn't sure how I was going to do it. I thought about screws from the inside? Clamps? I tried clamping it. At first I was unsuccessful. The angle of the gunnel wouldn't allow the clamps to put any pressure on the rail even with a long stick.

I came up with the idea of nailing a spacer onto the end of the sticks. After a trial, it worked, so I made a bunch of them. I figured I'd be using maybe a dozen clamps.

I found the center of the rub rail. I would start there and it would balance itself on the first clamp. I put an extra block on that first one so that the rail wouldn't drop out. I checked to get the rail position just right so that the front end of the rail would land at the stem. I glued up the rail and set it up. I put a screw in each end to make it tight. And with the breast hook and quarter knees, I couldn't get a clamp at the end anyway. I'll remove those and fill  the holes with epoxy later.

Hopefully I can glue up the other one tomorrow. It shouldn't take too long since I've got the method down now.


Monday, July 25, 2022

Rub Rails and "Floating" Floor

 Well, it's time to get to work on those odds and ends left to the build. I started tonight.

I cut out and scarffed my rub rails. I had a piece of 1x that was 11'+ in length and about 1,1/2" wide. I decided to rip it into thirds. That will make the rub rail kind of thin, but it's mostly for looks anyway. It should bend to the shape of the sheer plank easily.

I also started on the "floating" floor, at least that's what I call it. It is a removable floor that lifts to sit on the ledge of the cockpit to create a sleeping platform. 

I came across a pile of cedar last year in an abandoned building next to the church. I used it to make my gunnel and inwale. Most of it is 5,1/2" x 3/4" of various lengths. I measured the cockpit and figured 7 planks would do it. After I cut and trimmed them to 5.25" and laid them over the cockpit, I realized that I had failed to allow for the curve of the side seats. Oops! I came up a couple inches too narrow. I cut an eighth plank and retrimmed them all to about 4,15/16". That came out just about right. That will leave about a 1/4" gap between the planks. Here they are laid over the cockpit. I cut them all a tad long. I'll trim up the ends later.


I also need to find someone with a planer. That would make it so much easier to plane them down to 5/8" which will leave them flush with the seats when raised to make the sleeping platform. 

Then I will need to figure how to assemble them so they'll sit in the bottom of the cockpit squarely and lift out in two pieces. 


Friday, July 22, 2022

Interior Done!

I've reached another milestone. I've basically finished the interior (all but the little stuff)!! I'm under no illusions that I'm near done the build. We all know the devil is in the details and I sure have plenty to go, but it still feels good. I have a boat!!!


Seat Supports

The seat supports are in!

They are made from 2 pieces of 9mm ply. Here one is cut and the other drawn out.


Pattern for the supports. Each was a little different. 


Laminating the two pieces.


Gluing them in. The weights of course are holding them in place.


Fillets done.


Saturday, July 16, 2022

Furniture Installed!

Over the last week I have put two coats of urethane in the inside of the tanks and glued down the tops with fillets. 


I recut the deck plates. The first ones seemed just too loose after the width of the rotozip bit. I cut two that still weren't big enough and finally got the radius correct. Here are the left overs:


And here is a comparison of the two sizes of plates. Not a big difference but it's there.


And finally I have the side benches installed. I decided to leave them one piece instead of a removable section. It's simpler, it will make the hull just a bit stiffer and two good guys who have built CIY 16's recommended that I do it that way. They never use the removable seat. 


Here's a closeup of the fillet in one of the benches and another of the two benches.


Now I just need to build a support under the benches. 


Friday, July 8, 2022

Back At It

After a 28 day recess from boat building, I'm back at it howbeit a little slowly. Got to get back into the mode. Not much to show but I have glued up the spacers and "ledge" on the side seats. I'm still leaning towards making the seats as Clint has designed - with the forward portion removable. Hopefully more progress to show on the next post.

Here I'm gluing up the spacers underneath the seats.

Here I'm gluing up the ledges on the bottom of the seats. 

And here you can clearly see the ledge on the seat and on the bulkhead. This should work really well! Oh, the seats are not glued in yet.