Monday, August 30, 2021

More Scarfs

I was not able to get back to the scarfs last week, so it was at it again tonight. 

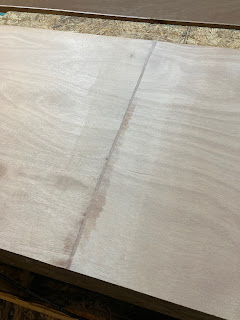
I started by sanding the first two. Of course, they had the red checks that stuck to them; so it took a bit of sanding. And one of them was not quite seated properly. I took some extra care to get the two I glued up tonight lined up evenly.

Here are a couple pics of the scarfs.


The first one looks pretty good. The second one was the one that was not set up just right. I actually sanded through the first layer of ply. Don't really want to do that. It will be painted, so probably won't be noticed.

Here are my second two scarfs (two layers) glued up.


I used a string to line up the two pieces tonight. My first two were a little off. I clamped a block of wood near one end of the two pieces of ply and drove a nail near the other end. Then I stretched a line between those two points and clamped another block at the strings edge where the two pieces of ply meet. Should be right on. I used a couple extra clamps to make sure everything stayed in place.


The two I glued up tonight each have the "extension" on them. These will be for planks #4 and #5. Here is a pic of that end. The second plank that will come out of this piece is short, so I have enough board to cut out a piece for the extension. The two I plan to do tomorrow night will be done the same way.  I used granddaddy's piece of rail to hold it down. 


Thursday, August 26, 2021

Gluing Scarfs

Tonight I glued up the first of the plywood scarfs. I decided to do them on the strongback two (4 pieces) at the time. With 12 pieces that will take 3 nights.

Here are the first two. This is my okoume which I will use to make the 1st and 3rd planks. The rest will be meranti.  


Tuesday, August 24, 2021

Finished Cutting Scarfs

I got two more hours in this evening and it was enough to finish cutting the scarfs. There were 16 all total. Four of the pieces I cut a scarf at both ends. They will need a second scarf for planks 4 & 5. With two 2' x 8' pieces scarfed together, you come up with a piece 2' x 15'10". You can see that planks 4 & 5 are a little over that.

Here is a pic of the planking layout.


On the sheets containing planks 4 & 5, there is enough leftover board on each one to cut out enough to scarf a few inches onto the ends giving enough for those two planks.

As a note: I cut the scarfs for the okoume last. The okoume made better scarfs. The wood is not as brittle as the meranti. Here are two pics of the last scarf I cut. It feathered down to a really fine edge. The meranti wanted to break off as I mentioned in the previous post. 


One thing I did differently tonight: I cut the second pass of the first cut in reverse. As I mentioned in the earlier post, I made my first 1/2" cut with the router in two passes, 1/8" each time. By reversing the second pass, that had the router bit cutting toward the edge first rather than cutting the edge first. I do think it helped significantly to get a better edge. 

Next step: gluing the pieces together. 


Monday, August 23, 2021

Cutting Scarfs

After setting up the scarfing jig and cutting 2 scarfs last week, it's time to get down to business and get these scarfs done. Tonight I spent about 2 hours cutting a few more. I ran into some difficulties. The scarfs  didn't seem to be coming out as nicely as the previous two. In fact, the router was ripping the bevel right off the end of the plywood. Here's a pic:

That should be tapered but it's obviously not. After a couple of those, I looked at the jig. I decided to move the guide so that the router bit would hit closer to the end of the ply. My bevel was ending 1/8 to 3/16 from the end. That turned out disastrous, so I moved it back.

After looking again, it looked like the ply wasn't sitting flat on the board. I figured that "play" might be allowing the router to tear up the end of the bevel, so I added another strip of spacer under the ply just as it feeds into the jig to raise the angle of the ply and made sure that my wedge was tight and holding the ply down flush with the board. It seemed to help some.  

I cut a few more. They are not perfect (how often will I say that?). They will have to do. I've got about seven more to cut. Should be able to do that tomorrow night. 

Friday, August 20, 2021

Time to Wakeup Anago

Anago has been asleep for over 2 years. I haven't had her uncovered, let alone out of the yard and into the water, since the big trip up the ICW with Norm. I have contented myself with little excursions on Little Bit, the SD11; but now she's gone. Most of my time is going to building the CIY 16, but I do need to get out on the water. I had a full day today and Robin left early afternoon. The temps were in the mid 80's, partly cloudy with low rain chances: the perfect opportunity to get her cleaned up. I'm hoping to do a couple short excursions this fall. I want to go to the Glen-L "Gathering" in mid-September, which is on Chickamauga Lake this year, and maybe do the Tennessee River gorge on Nickajack Lake in October.


And I put her back to bed for a short time hopefully!


Tuesday, August 17, 2021

Big Night

Tonight was big. There will be more "big" nights but this was one of them. 

I started by working some more on the routing jig. Last night I watched a few videos on scarfing and decided that routing should work. After fiddling with it for another hour, I settled on giving it a try.

After supper I went to the garage and pulled out all the planking plywood, 6 sheets - 4 meranti and 2 okoume. I'm using meranti to try to save a few bucks (about $100), but felt I needed okoume for plank #1 which has the most bend in it. Since plank #3 is made from the same piece, it will also be okoume; but the hull will be painted so no big deal. Meranti is a little heavier but it won't really factor significantly into my boat. 

Clint designed the CIY 16 so that the planks are cut from 24" wide plywood. That's really convenient. So I cut the six pieces down the middle. I used the skill saw and a 1x4 as a guide. I'm cutting on the pallet.


Here are the pieces after cutting. Once scarfed, they'll be 24" x 16'!


Here are some pictures of the scarfing jig in action. It's kind of hard to make out various pieces, but I cut two triangles with a 14:2 rise (to give me a 7:1 scarf). There are two boards running between the tris with a gap just big enough to give me 2,1/2" of leeway, which is enough wiggle room for my scarf joint, with the router. Then there is a board running crosswise that the ply will sit upon and butt up against the lower board. 

Here is my sketch of the jig. I made a couple changes when I built it. It's 27" wide and the board across the bottom that the plywood sits on is butted up against the lower guide board. I did that to give me a "stop" for the plywood and to bring it into closer proximity to the router bit.


The jig is attached to the strongback with two screws and a board clamped down on the strongback.


In this picture you can see I've run across the ply with two passes. The dark board is just sitting there. I made 4 of those of widths varying by about 7/16", each one for a different pass. My bit is 1/2". The lighter board that is nailed down is my guide.


In this pic you can see a couple of the removable boards.


Here you can see two spacers which give me room to run the router all the was across the ply. The jig is 27" across. The ply 24".


Here is a picture of the other side of the jig with more spacers and a wedge to keep it tight laterally when routing. 


And then I wedged my practice scarf between the ply and the top router guide board. All of this was to keep the ply from moving. There are a lot of forces working on that ply when routing.


Here is a final scarf joint. 


I did two. The first I had the same trouble I had on the trials. The slight edge I was leaving (about 1/16") was getting ripped out by the router. On the second piece, I made the first pass twice. The first time with the router set not quite as deep. The second pass all the way down. It seemed to work better. The edge is "feathered" but that's ok. The epoxy will fill that. The slope is even. I'm excited!!!

Here are the first two pieces waiting to be glued together.


Monday, August 16, 2021

I Think It's Time

I could do more, but I think it's time to get to the hull. My, oh, my! That means serious business. Scarfing, cutting planks, getting strongback square & level, setting up molds plumb.  There's a whole lot to it and it's a bit scary. 

Tonight I tried to put together a scarfing jig. I've been thinking I was going to try to do them with the router. Here's what I've come up with so far.


Here's the jig with a trial piece routed. I tried one earlier and it made the edge a bit rough so I thought I'd try and leave a little wood that I could maybe sand off later or may plane off and leave a good edge. Didn't have much success with a trial. 

Trials were hard because I'm using small pieces of wood and they want to move around. There's a lot of forces at work when you're routing. 

After a couple hours of trial and error, I decided to try just planing with the power planer. I took a left over piece of 9mm meranti and it came out pretty decent. It even had a nice edge on it if you can see it in the second picture. The cut out in the middle of that board is where I tested the router on the jig. 


I'm not sure what I'm going to do. I may try it one way; and, if it doesn't come out right, try it the other way. I can experiment a little bit because one of the plank sheets has some left over at the end. We'll see.